
Casting On: Using Cast-on Rag and Ravel Cord
In the previous cast-on methods, you need to knit a few rows before you can add weights, otherwise they can damage your knitting carriage. This can be difficult when you are knitting a textured pattern such as tuck or slip stitch, or when you are doing lacework..
A great solution is to use a cast-on rag before you start knitting. You can hang weights onto your rag. To separate the rag from your knitting you knit a row with ravel cord. This post will show you how to cast on with a cast-on rag. .
Cast-on rags are easy to make and I show you how to do this here..
You can use a cast-on rag for creating an open loop cast-on (where the stitches can unravel but can be picked up to create a folded hem) and a closed loop cast-on that creates a firm edge.
.
Instructions
Both Methods
If you are going to start knitting with a pattern, then set up your pattern device and lock or pause it. Put the carriage on the left. (Left-handed people may wish to do the reverse all these instructions).
Using your needle pusher put the required number of needles into hold. (In some hems/welts you may be using using alternate needles).

.

Brush back the latches. This makes it easier and quicker to hang the rag..
Add rag (or rags) to needles
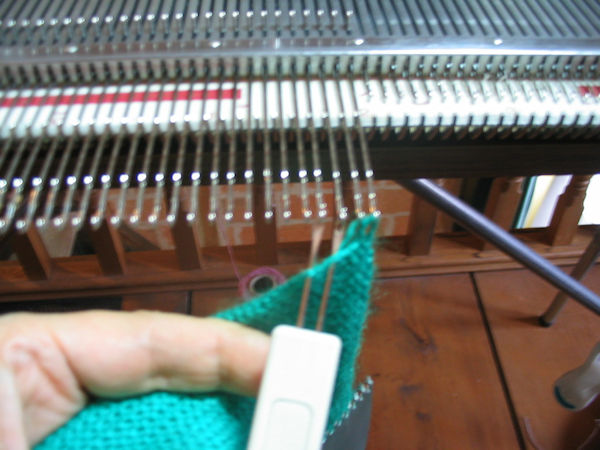
Take your rag, with the loops uppermost, and a 1-pronged tool, starting at the right end needle, transfer the first loop onto the needle. As you get good at this you can try using a 2-pronged tool to transfer two loops at a time. This saves times if you have a lot of needles..

Keep adding loops, one loop per needle until all needles are filled. Add weights to hold the rag loops on the needles..
If you have more needles than loops you can add the loops from second rag.
.
Add ravel cord

Ravel cord can be used to link the rag to your knitting for now and then be removed later.
Take some ravel cord in a different colour to you knitting and to your rag. I like to store mine on some shaped cardboard and keep it near to my machine ready for action.
.

Hang a peg to the end of ravel cord. Open carriage gate and thread with ravel cord with about 30 – 40 cm of cord (with peg) hanging down. Close gate. Hold the rest of the cord loosely in your left hand.
You can use this ravel cord knit row to set up your carriage to pick up your pattern (lock your punchcard or EC1 so that you do not actually knit the pattern).
.

Now move the carriage to the right to knit a row with the cord, allowing the carriage to pull the cord through your fingers. Usually you would knit the cord at stitch tension MT+1 (main tension plus one whole number). Take cord out of carriage and wind up loose end and peg so that it does not get in the way of your knitting..
Open Loop Cast-on for rolled/folded hems without a ribber
Set up knitting carriage with main yarn and correct tension.

Then knit desired number of rows.

When you have finished your hem, you then pick up the bottom loops of your knitting and put on the needles and then knit a row to finish you hems. I will include instructions on making hems in a future post..

Closed Loop Cast-on
Once the rag is on and weighted you can do a closed loop cast-on, e.g. an e-wrap or a latch tool cast-on and then switch on your pattern device (if using) and start knitting.
.

Once you have finished your knitting and removed it from your machine, you simply pull out the ravel cord to separate your knitting from the cast-on rag..
You can then safely store your cast-on rag for future use..
TIP: Cast-on rags can also be used to protect your knitting when needles are in hold..
Happy Knitting!
.
Carol
.
.


2 Comments
Anonymous
Dear Carol,
I have just found Wicked Woolies post. I have bought a second hand Brother KX390 knitting machine. It wouldn’t work so my husband stripped it down, washed the needles, cleaned and oiled the bed and carriage using a silicone oil spray. It now works but the stitches fall off the needles at each end of the swatch. It is so frustrating. I loved your casting on post which I found on my phone, is there anyway I can get your links, to download, ( my friend told me to ask you ) I am a beginner and would love to be able to learn how to use the machine. I hope you can help me. X
wicked woollies
Hi Anonymous I am not sure what you mean by links? Do the text links not work on your phone?